
Breaking News 
 News Archives News Archives
Submit News
News Only
Mobile News
 NewsBoy NewsBoy
ROM Files
Arcade Emus
M.A.M.E.
Console Emus
GameBoy Adv
PlayStation 2
PlayStation
Nintendo 64
Dreamcast
Pinball Emus
Front-Ends
Cabinet Pics
Forums
Site Map
Site Links
Contact Us
362,333,605 Served
142 Users Online
|
|
 |
Arcade@Home Cabinet Q&A
|
Q: What hardware are you using?
- AMD K6-2 300MHZ (100Mhz bus speed) w/3D-Now!
- 64MB RAM (PC100)
- FIC VA-503+ main board
- AGP Diamond Viper V330 (NVidia Riva 128)
- Western Digital 4.3GB hard drive
- Creative AWE64 sound card
- Interact 3D Program Pad (SV-235) (for the joystick/buttons)
- Hacked keyboard (for non-player buttons)
- Interex PC-200 (hacked PC trackball)
Q: How long did it take you to build it?
2 weeks and about 40-60 hours of labor.
Q: Did you consider mounting the monitor vertically?
Yes, but Windows and other non-MAME games would not have the
correct orientation. Also, mounting the monitor on it's side would have
been more difficult. Once you remove the monitor stand, most monitors
are flat on the bottom. Their sides, however, are usually are quite odd
shaped and don't offer any good place to position mounting bolts.
Q: What about adding a steering wheel or flight yoke?
I plan on getting a steering wheel, Star Wars yoke, and a spinner
in the future. I've purposely not used the joystick port on my present
configuration so this could be done without conflict.
Q: Why not a slide-out keyboard under the control panel?
When I was thinking of building a cabinet, a slideout keyboard was
in the plan. I didn't do it on my machine because I didn't want to take
away the arcade machine look. Also, the keyboard does just slide out
the coin door. If I ever decide to reconfigure everything, I'll
probably go with a cordless keyboard and install a small window for the
keyboard sensor.
Q: Why no control panel graphics?
I currently have the control panel covered with a tough black arcade quality
control panel overlay. To replace it, I'd need something as tough as what I've got,
and 18" wide. So far, I haven't been able to find anything that would work (I don't
really like the look of plexiglas.
Q: What trackball did you use?
I used an Interex PC-200 that I purchased from Egghead
(it was $14.91). Any trackball that has a ball of around 2" to 2-1/4"
should work. Don't buy a $100 trackball though. For that kind of money
you should purchase a real arcade trackball from Happ Controls.
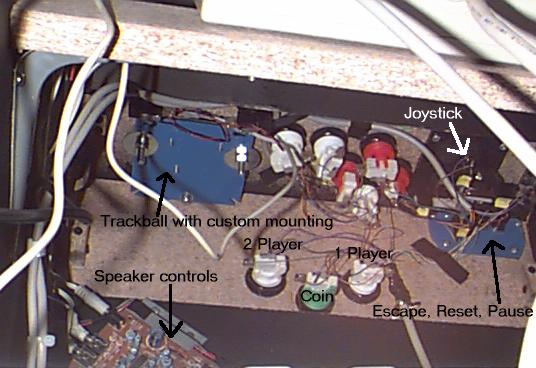
Q: How did you mount the trackball?
I took the case off the trackball to find that there was just a simple
PCB inside. I mounted the PCB to a piece of square plastic used for
electrical boxes (about $1.00). I drilled a 2-1/2" hole into my 3/4"
particle board control panel. I then took another plastic electrical box
cover, this time round (about $1.00), and cut a 1-3/4" hole in it. I had to
use a small drum sander to make the hole a little bit bigger, and tapered.
I centered the round cover plate on top of the hole in the control panel
and marked the position of the pre drilled holes in the top plate. I drilled
holes through the control panel and through the plastic that the PCB is
mounted to (all centered). I used two 3" carriage bolts, lots of nuts
and washers and a few split washers to keep everything in place. You
need to do a lot of adjusting of the nuts so that the ball rests against
the top plate just the correct amount. Too tight and the ball won't spin.
Too loose and the ball will "chatter" when spun. The split washers have
kept everything in place since this initial adjustment. You can see the
way it's mounted in this picture: Underside of Control Panel
Q: How does the trackball interface with the PC?
The trackball uses just a standard serial port and works like a
standard mouse. I wired two black arcade buttons to be used for the
left and right mouse buttons. Since the computer thinks it's a standard
mouse, I can use the trackball to select games or use in MAME for games
like Centipede and Missile Command.
Q: Where did you get the buttons and the Joystick?
The buttons are of the micro switch variety and are from
Happ Controls ($1.35). The joystick
has leaf switches and was purchased from Wico (800)FOR-WICO ($9.95). I'd
recommend using micro switch buttons and leaf switch joysticks. Happ
doesn't sell leaf switch joysticks and the micro switch models make too
much noise.
Q: How did you wire the buttons/joystick?
I used two different methods. For the front of the control panel I
wired directly from buttons on my keyboard. I used a 25 wire serial
cable and lopped the ends off. There are a total of 6 buttons and 2 LEDs
that are wired up (which means that I used 16 wires out of 25). For
each button I just soldered to the back of the keyboard where the button
was. I drilled a hole in the top of the keyboard for the cable to come
out and screwed the keyboard back together. My keyboard now has two
cables coming out if it. One goes to the computer and the other goes
to the front of the control panel.
For the top of the control panel I used an Interact 3D Program Pad model
number SV-235 (~$30). It's available at Best Buy and many other stores. I just
soldered wires from the joystick to the control panel (buttons and joystick). I used
(2) 10 wire cables to make it as clean as possible. I did NOT wire to the direction
pad on the joystick. I wired to the 10 OTHER programmable buttons. This
was done because, for some reason, the control was VERY erratic when it
was wired to the direction pad. Because this joystick allows you to
program it to use any keyboard key(s) through software or directly makes
it nice to use other programs that may not allow you to configure the
buttons. Also, I use ONLY the keyboard port so the joystick port is
still free for my Star Wars arcade control yoke project I plan to take
on. One other thing, there is a program button on this joystick that
I wired to a small button on the inside of the cabinet. You must press
this button to program the buttons.
See the layout and how it's programmed: Control Panel Layout
Q: What do you use the 2 LEDs for?
On many games in MAME, the Num Lock and Caps Lock LEDs flash for one or
two player games depending on how many virtual quarters you insert. I
snipped the LEDs on the keyboard and wired it up. I purchased a pack
of (3) LEDs from Radio Shack (~$2) that was designed to be popped into a
hole. This was needed because the control panel is so thick. This little
touch really adds a lot to the realism of the machine. I just wish that
all MAME games would support it!
Q: Why didn't you use the coin mechanics?
There were several reasons I wired in the green virtual coin button
instead of using the coin mechanics. First, there was no room for the
coin box (the PC sits where it once was). Secondly, it's kind of a pain
to keep inserting coins, opening the coin drawer, "fishing" coins out,
inserting, etc... Most people that have original arcade video games just
leave the coin door open and hit the switch for credit instead of dealing
with the quarters. Thirdly, certain games require you to wait a while
after boot-up before it will accept quarters (Centipede). Because of
these reasons, it seemed like the only clean way to go.
Q: How did you mount the monitor?
Very carefully. The monitor is mounted at a 45% angle and didn't
have any type of mounting holes on the bottom. I first had to find (4)
places on the monitor where I could mount bolts. There are now
(2) 2" bolts in the front and (2) in the back. There was already
a board in the cabinet right next to the display glass that I drilled holes
parallel to the glass. I then took a board that was as wide as the cabinet, about
4" deep, and 3/4" thick. I drilled (2) holes for the back two bolts
then slid the front bolts into their holes. I held the monitor at the
correct angle (parallel with the display glass), and marked the position
of the back board. Using (2) shelf braces I secured the back board in
the marked position. I put everything back together and secured the
bolts with washers, split washers and nuts. I thought I was golden until
I turned on the monitor. I realized that the colors were WAY off!
It would appear that the monitor is more prone to magnetic fields when
it is tilted. Luckily, turning the cabinet 90% removed all magnetic
distortions (the machine is in my basement and right next to my hot
water heater, furnace, etc).
Q: Do you run MAME from within Windows?
Yes. I use my own Arcade@Home
front-end which includes images of each game. Arcade@Home runs the DOS
version of MAME (which I find much faster than the Windows DirectX
version).
Q: How are you running Dragon's Lair?
Q: Why didn't you use two joysticks?
My original plan was to have two joysticks and one or two more
buttons. However, once I did a mockup, I realized that the control
panel would have to be too large for a mini cabinet. If you have a
full-size cabinet, then you should have about 5 more inches which may
give you enough to add a second joystick, but maybe not enough for a
joystick and 6 more buttons. You should also consider how all of these
buttons will be wired to the PC. I use both a keyboard and a
programmable keyboard (joy pad) hardwired to the control panel.
Depending on what type of interface you use you could have a problem
with the number of simultaneous buttons being pressed. In other words,
creating a real mockup is REALLY important in testing everything out. I
used a piece of scrap particle board to position everything. The first
one was way off. The second one was a lot closer. Then I just traced
the holes into the real control panel. To do all of this, you need to
have the trackball, buttons, and joysticks first because you need to
consider the mounting and wiring into the equation.
Q: How did you decide on the button/joystick layout?
The layout of the control panel was something that I drew up many times
and even made a couple mockups to see how everything fit together. I
can give you a few suggestions about designing a control panel. First
off, make sure you have enough room to the sides of your joystick so
that your hand doesn't hit the side of the console (if your console has
sides that stick up like mine). Also, place the buttons as close to the
joystick as possible. This makes games like Stargate possible because
there needs to be a button RIGHT next to the joystick to switch
directions. Positioning the buttons in straight rows seems to make the
most sense until you try using them. Most arcade machines positioned
the buttons so they would fit your middle finger, index finger, and
thumb on your right hand. Look at an Asteroids, Stargate, and Xevious
control panel, the buttons are at diagonals. If you look at the images
of my control panel, the white buttons line up exactly where these three
fingers would rest. Positioning the buttons at an angle also allows
you to pack the buttons a little closer together. Also, make sure you
have enough room to each side of your trackball or your hand will hit
buttons when you are moving around. Finally, as for controlling MAME,
I use three buttons "hidden" at the top/left of the front of the control
panel. They are recessed and have a stiff spring so I don't
accidentally bump into them. The three buttons are Escape, Reset, and
Pause.
|
|
